
A malfunctioning defrost heater can leave your refrigerator freezer frosty and food soft, but replacing the heater yourself is a manageable repair. After unplugging and emptying the appliance, remove shelves and panels to access the evaporator coils and heater. Detach the heater’s wires and fasteners to remove them. Install a new heater, reconnect the wires, and replace the panels and shelves. With the right tools and safety precautions, you can breathe new life into your refrigerator in just a few steps. This straightforward repair keeps your food chilled and freezer frost-free.
Required Tools
Replacing a defrost heater in a refrigerator is not too hard. But you do need the right tools! Having the proper equipment will make the repair job safer and easier.
Let’s go over the main tools you’ll need:
Work Gloves
Be sure to wear thick work gloves. They will protect your hands from cuts and scrapes. Handling sharp metal edges can be dangerous without gloves!
You’ll be working with many hard and pointy parts inside the refrigerator. The gloves form a shield around your hands and fingers. This way, you can work without fear of injury.
Nut Driver Set
A nut driver set allows you to loosen and tighten different-sized nuts and bolts. Refrigerators use several standard nut and bolt sizes.
Having the right nut driver avoids stripping out the refrigerator’s hardware. It also gives you the power to fully tighten connections. Loose nuts and bolts can cause problems down the road.
A good nut driver set has drivers of different sizes. It often comes in a case to keep the tools organized, too.
Needle Nose Pliers
Needle nose pliers help you grip wires and small parts. Their long, thin design can reach into tight spaces.
You’ll need to detach and reconnect the wiring during the repair. Pliers provide precision in handling the refrigerator’s small and fragile wire connectors.
The pointed plier tips also straighten bent metal pieces if needed. This is useful when working around the thin aluminum tubing in refrigerators.
Now you know the main tools for replacing a defrost heater! Having this equipment ready will make the repair job easier and safer. With the right tools, you can fix the defroster with confidence.
Understanding the Defrost Heater
The defrost heater has an important job in your refrigerator. Knowing how it works will help make sense for this repair. Let’s review the defrost heater and why it matters:
What Does the Defrost Heater Do?
As your refrigerator runs, frost builds up on the evaporator coils. The defrost heater melts away this frost buildup.
How does it work? The defrost heater turns on periodically to warm the coils. This thaws the ice, allowing the water to drain away.
Without a working defrost heater, frost would continue thickening on the coils. Air wouldn’t flow properly to keep food cold.
Signs of a Problem
A bad defrost heater shows symptoms over time. Here are some clues that the defrost heater needs replacing:
- Frost buildup inside the freezer
- Reduced cooling ability
- Food freezing in the refrigerator section
Don’t ignore these signs! A faulty defrost heater only gets worse.
Why Timely Repair Matters
Replacing the defrost heater soon after problems start prevents bigger issues.
Too much frost makes the refrigerator work harder. This can lead to the failure of other parts like the compressor.
Taking care of the problem quickly avoids food spoilage, too.
Now you know why the defrost heater is important for refrigerator operation. Recognizing issues early and replacing the heater will restore proper cooling.
Safety First!
Repairing a refrigerator defrost heater is not dangerous. But there are a few safety steps to take first. Being cautious will prevent accidents.
Let’s go over some smart precautions:
Unplug the Power
Always unplug the refrigerator before working on it. This avoids electric shocks from accidental contact with live wires.
Make sure to unplug at the wall outlet, not just the back of the fridge. You want the power completely disconnected. No chances for surprise shocks!
Wear Protective Gloves
Thick gloves form a barrier between your skin and the fridge. As mentioned before, they prevent cuts from sharp metal and coils.
Gloves also insulate if you accidentally touch exposed wires or cold compressor pipes. Better to be overprepared!
Handle Wires Carefully
Electricity powers the defrost heater. So, use extra care when disconnecting and reconnecting wires.
Keep wires organized and out of the way. Avoid crimping or straining their connections. Damaged wires can lead to defroster failure or dangerous sparks.
Also, check that the wiring is reattached securely. Loose wiring causes problems over time.
By unplugging the fridge, wearing gloves, and handling wires with care, you avoid mishaps. Safety first means you, your home, and your refrigerator will be fine!
Handy Troubleshooting Tips
Before replacing the defrost heater, some easy checks can confirm the problem. Troubleshooting first avoids wasted effort.
Here are useful things to try:
Test the Defrost Heater
Use a multimeter to check the heater for continuity. This tests if electricity flows through it.
No continuity means the heater wiring is broken. The heater needs replacing. Continuity points to another issue.
Inspect for Frost Buildup
Open the freezer and feel along the evaporator coils. Thick ice forming on the coils indicates defrost failure.
The buildup in the back of the freezer is hard to see. Running your hand along the coils lets you find frost and ice.
Ensure Proper Installation
After installing the new heater, carefully check your work. Make sure the heater sits flush behind the coils. Review all wire connections are secure.
Also, confirm no tubing got crimped or displaced. Proper installation prevents future malfunctions.
Taking these troubleshooting steps first saves time and effort. You’ll know the defrost heater needs replacing before digging into the repair.
Replacing the Defrost Heater Step-by-Step
Replacing the defrost heater is a straightforward repair once you know the process. Follow these steps closely for success:
Turn Off the Power Completely
Start by unplugging the refrigerator from the wall outlet. Do not just unplug from the back of the fridge – disconnect fully at the wall. This cuts all electricity to avoid accidental shocks.
Also, turn off the house circuit breaker that controls the refrigerator. This doubles your safety by cutting power at the breaker box. Take every precaution when working with electrical appliances!
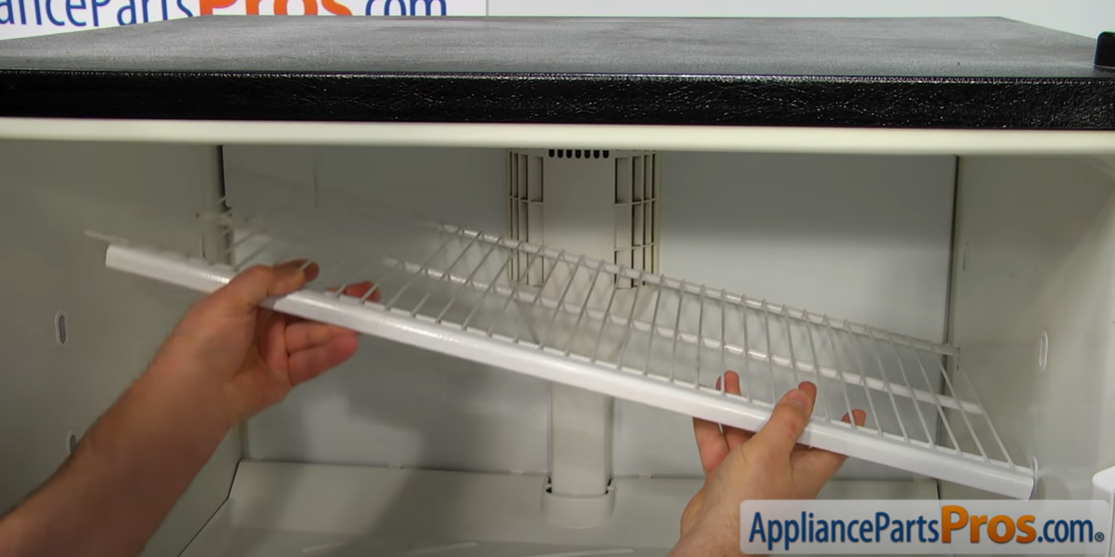
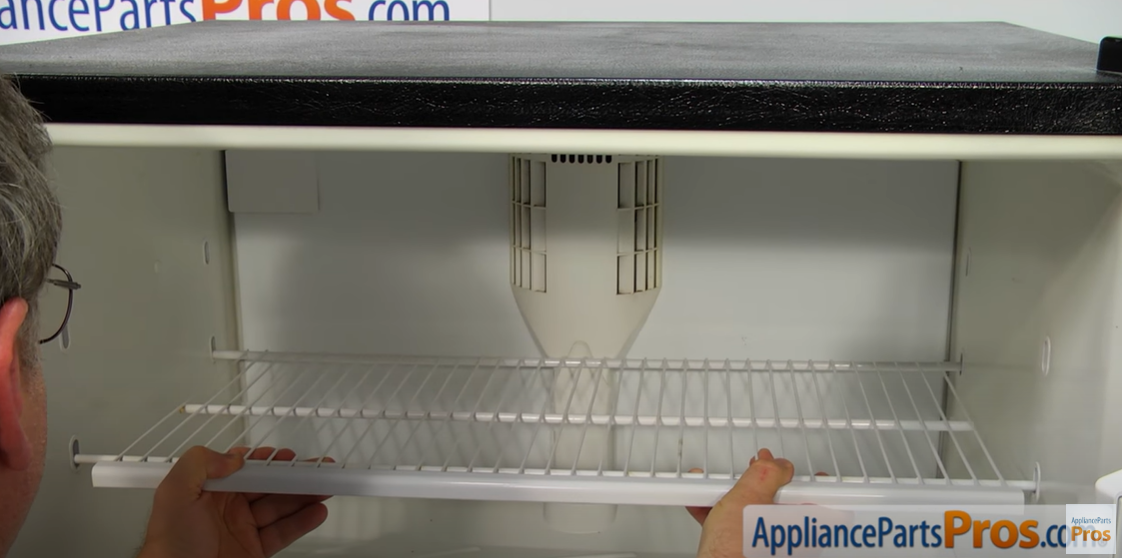
Remove All Freezer Shelves and Food
Clear out all shelves, drawers, and food contents from the freezer. This creates open space to access the evaporator housing. Place the removed items in a cooler to keep them frozen.
To remove the top shelf, first, take out the plastic spacer at the shelf’s back. Gently pull the shelf towards you. Shift it left to detach the right side from its mounting holes. Tilt the shelf to lift it fully out of the freezer.
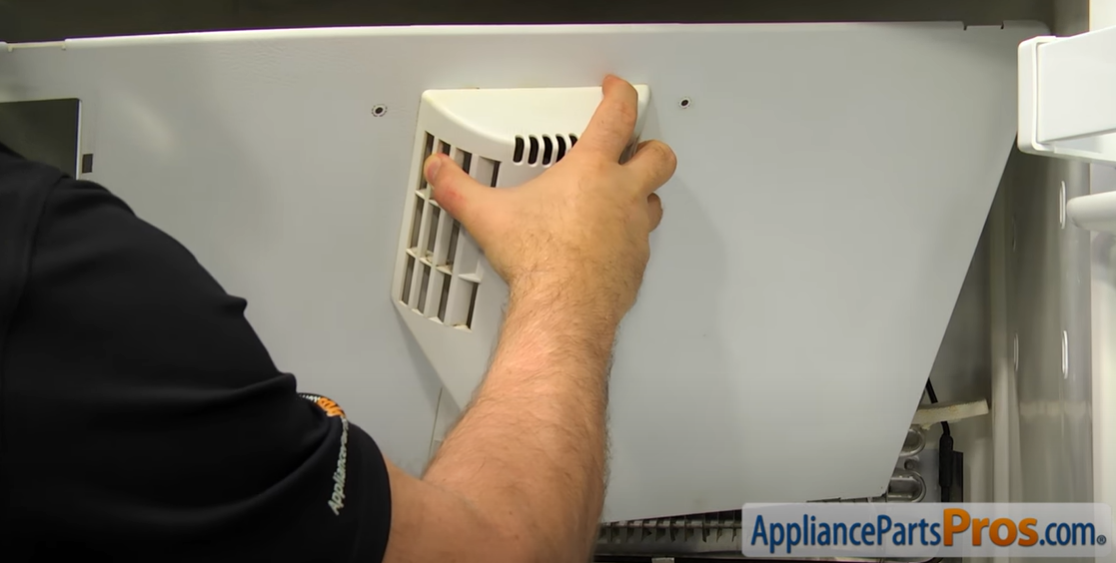
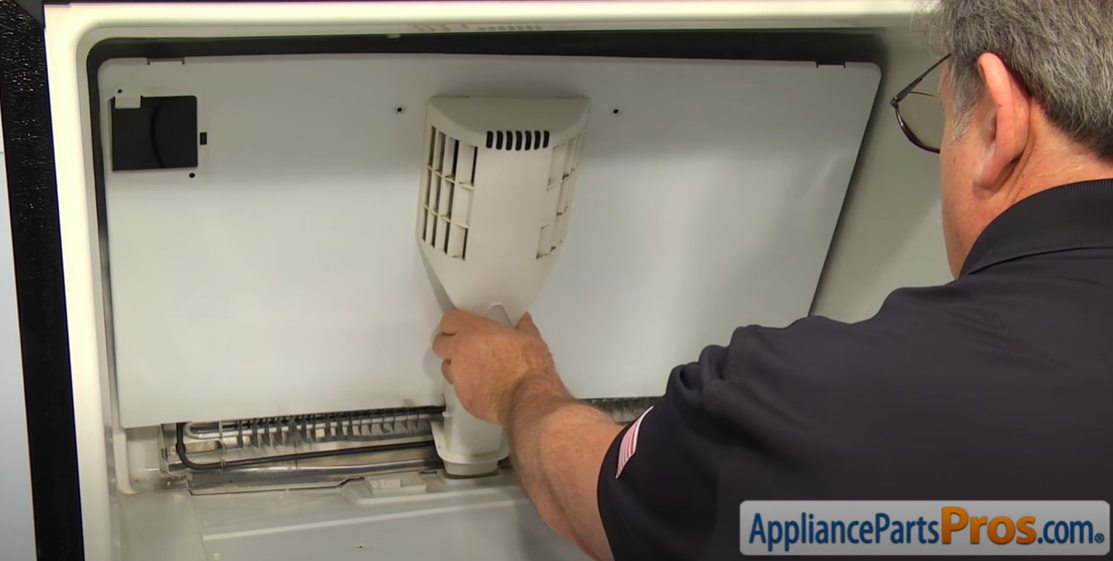
Detach the Evaporator Cover
The evaporator coils and defrost heater are protected by a plastic cover. To remove it, first unscrew the mounting screws along the top and sides. There are usually 6-8 screws. Keep the screws organized in a container.
With the screws out, gently lower the top part of the cover down. This will disconnect the wire harness leading to the evaporator fan. Use care not to crimp or tear the wires.
Next, slide the whole cover leftward. This will detach the two wire connections on the right side. One connects to the ice maker in the freezer. The other is a ground wire. Again, use caution not to damage any wires.
After disconnecting all wiring, the evaporator cover can be fully removed. Set it aside carefully.
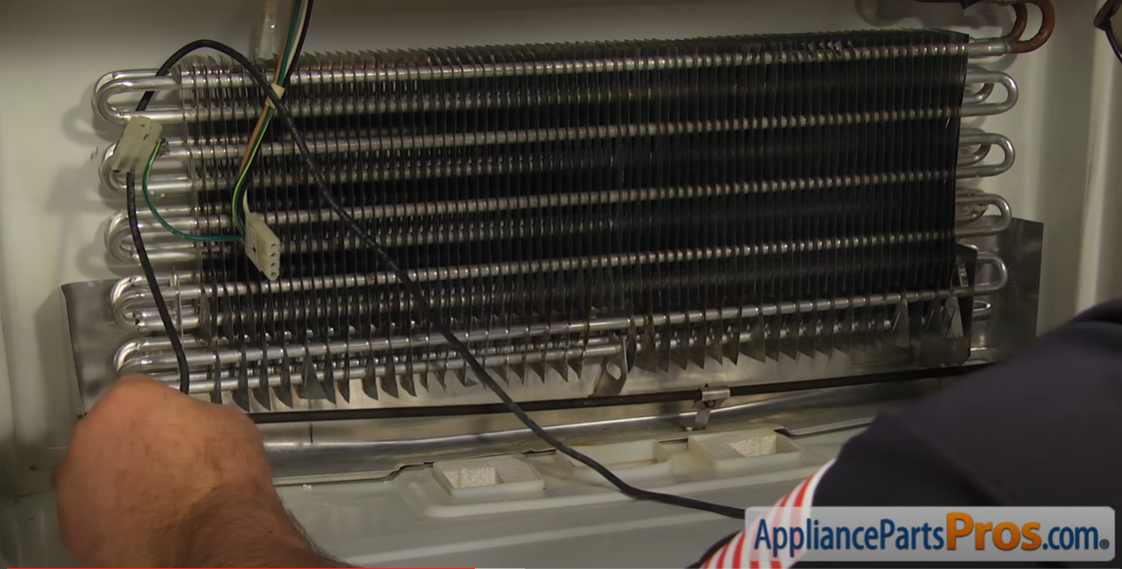
Remove the Defrost Heater
With the cover off, you’ll see the evaporator coils and defrost heater underneath. Locate the defrost heater on the right side. Unplug the wiring from the heater terminals.
At the bottom are two thin aluminum straps that hold the heater in place. Loosen the bracket screws and straighten the straps to release.
Gently shift the evaporator coils sideways to make room. Maneuver the defrost heater out from beneath the coils. Remove the old defrost heater.
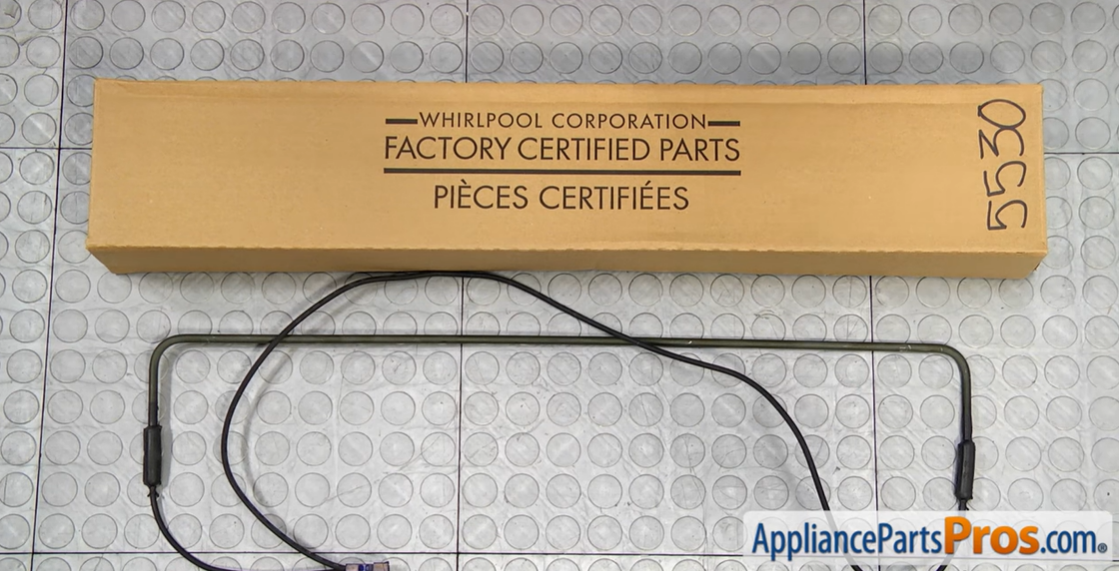
Install the New Defrost Heater
Carefully insert the replacement defrost heater into the same space behind the evaporator coils. Position it straight and level beneath the coils.
Rebend the aluminum straps over the heater and tighten the screws. This holds the heater securely in place.
Attach the heater wiring to the terminals following the color labels. Double-check the connections are tight. Proper wiring prevents issues.
Reattach the Evaporator Cover
With the new heater installed, slide the evaporator cover back into position. Reconnect the ice maker and ground wires on the right side.
Lift the top of the cover to meet the fan wiring plug. Make sure the connections snap together fully.
Finally, screw the cover back down using all the original mounting screws. Check it is centered and secured properly.
Return the Freezer Shelf and Food
Place the freezer shelf back on its left side mounting holes. Gently shift the shelf right to snap into the right holes. Make sure the plastic spacer is also replaced.
Return all the freezer contents and shelves to their original place. Your freezer will be back in order.
Restore Power Supply
The repair work is complete! Restore power to the refrigerator by plugging it back into the wall outlet. Also, flip the house circuit breaker back on. This will power up the fridge and new defrost heater.
Let the refrigerator run to verify normal operation. The frost buildup will melt away over time. Enjoy having your fridge working right again!
Also watch How To: Whirlpool/KitchenAid/Maytag Defrost Heater WP2315530
Job Well Done!
Replacing a defrost heater brings your refrigerator back to life. Just follow the steps to avoid the hassles of frost buildup.
We covered the key tools you need and safety tips. Now you understand how the defrost system works, too.
With some handy troubleshooting, you confirmed the heater was really the issue. Great job walking through each repair step!
Of course, reading instructions is different than doing the work. Be patient, move slowly, and double-check everything. Don’t force components – they fit together a certain way.
You may need a few tries to get the hang of refrigerator repairs. Each project makes you more skilled! With the right parts and tools, you can handle this job.