
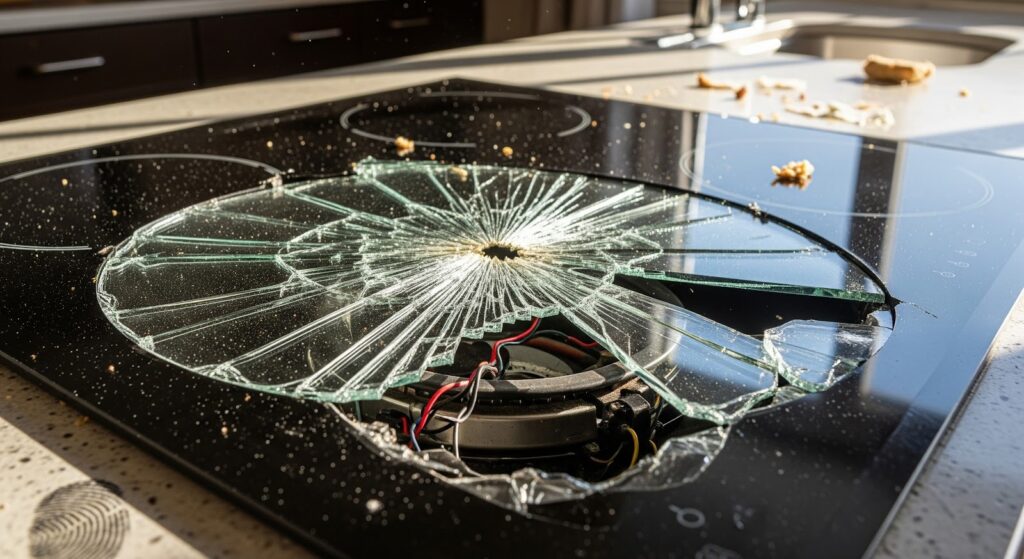
Has your sleek glass cooktop lost its shine thanks to unsightly cracks or breaks? Beyond being an aesthetic issue, a damaged glass surface can actually pose a serious safety hazard, including the risk of electrocution.
The good news is that replacing it is simpler than you might think. With just a few tools and a bit of care, you can restore your cooktop to its former glory safely and quickly.
Why You Should Replace a Cracked Glass Cooktop
That modern glossy surface might look great until it’s marred by spiderweb cracks or a full-on break. Unfortunately, there’s no quick wipe or polish that can fix it. Once the integrity of the glass is compromised, using the cooktop becomes dangerous.
A cracked surface can expose live electrical components beneath the glass, which is why replacement is essential, not only for aesthetics but also for your safety.
Replacing the glass top is usually a straightforward DIY project that takes only a few minutes. Let’s walk through everything you need to know.
What Causes Glass Cooktops to Crack?
Even though they’re built to withstand heat and pressure, glass cooktops are not indestructible. Understanding what causes cracks can help you prevent future damage.
1. Impact Damage
The most common cause of cracks is impact from heavy objects. Dropping a pot, bottle, or even setting down a cast iron pan too hard can fracture the glass instantly.
2. Surface Scratches
Repeatedly sliding pots and pans across the surface can cause fine scratches that weaken the glass over time.
3. Dirt and Residue
Crumbs or grit on the bottoms of pans can grind into the glass, creating micro-scratches that eventually lead to cracks.
4. Temperature Shock
Rapid changes in temperature, such as placing a hot pot onto a cold cooktop, can cause sudden cracking.
5. Melting Plastic
Leaving a plastic utensil or bag near a hot burner can cause it to melt onto the surface. Not only is this messy, but it can also warp or weaken the glass.
With mindful use and regular cleaning, your cooktop can stay flawless for years. Always check your appliance’s manual for any manufacturer-specific care tips, too.
Tools You’ll Need
Before starting, gather these tools and materials:
- A towel (to protect your counter and the cooktop edges)
- Two wooden support sticks (to prop up the top while working)
- A Phillips screwdriver
- A putty knife
- A razor blade
- Foam tape (part number: WB2X9902)
- (Optional) Clear tape (part number: WB06T10007)
Having everything ready before you begin makes the replacement process smoother and faster.
Safety Tips Before You Begin
Working with any electrical appliance requires care. Before you start, follow these precautions to avoid accidents and protect your home:
- Unplug the range or switch off the power at the circuit breaker. Never work on a live appliance.
- Wait until the surface is completely cool before touching any part of the cooktop.
- Use safety gloves to protect your hands from sharp glass edges or metal frames.
- Keep a clean workspace free of clutter, cords, and flammable materials.
- Label screws and parts as you remove them, so reassembly is easier later.
- Work with good lighting to spot hidden screws and connectors more easily.
- Avoid leaning on the cooktop while removing it to prevent further cracking.
Taking these precautions keeps the process safe and stress-free.
How to Replace a Range or Stove Glass Cooktop Assembly
Follow these steps to safely remove an old glass cooktop and install a new one on your range or stove.
Preparation
- Disconnect power by unplugging the cooktop or turning off the circuit breaker.
- Open the cabinet below the cooktop and locate the mounting brackets securing it to the countertop.
- Remove the screws from each bracket using a Phillips screwdriver.
- Bend the brackets downward to allow easier removal of the cooktop.
Removing the Old Cooktop
- Push up from underneath to test if the cooktop lifts freely from the counter.
- If the cooktop does not lift easily, slide a putty knife or razor blade between the cooktop edge and the countertop to loosen the foam tape seal.
- Work carefully around the perimeter to separate the cooktop without scratching the surface.
- Lift the cooktop slightly and place two support sticks across the countertop opening.
- Rest the cooktop on the sticks to keep it propped up.
- Remove all burner knobs by pulling them straight off.
- Use a Phillips screwdriver to remove the screws securing the glass top to the chassis.
- Cut or peel away any tape holding the glass to the chassis with a putty knife.
- Lift the old glass top carefully so the control shafts clear their openings.
- Remove and dispose of the old glass and clean any debris from the chassis.
Preparing the New Cooktop
- Lay a towel on a flat surface and place the new glass cooktop upside down on it.
- Measure and cut strips of double-sided foam tape to fit along each side of the cooktop.
- Apply the tape smoothly near the edges and trim any excess.
- Remove any old tape from the chassis lip.
- Apply new clear tape around the perimeter of the chassis where the glass will rest.
Installing the New Cooktop
- Align the new cooktop over the chassis and lower it carefully into position.
- Check that the control switch shafts are properly positioned.
- Reinstall the screws securing the cooktop to the chassis.
- Reattach the burner knobs, aligning the flats or tabs correctly.
- Lift the cooktop slightly, remove the support sticks, and lower it fully into the countertop.
- Bend the mounting brackets back into place and reinstall the screws to secure the cooktop.
Testing
- Restore power by plugging in the unit or turning on the circuit breaker.
- Test the cooktop to confirm it is stable, the knobs turn properly, and all heating elements function correctly.
How to Care for Your New Glass Cooktop
Once your new cooktop is installed, proper maintenance will keep it looking like new for years.
- Clean after each use. Use a soft cloth and a cooktop cleaner made for glass surfaces.
- Remove spills quickly. Burned-on residue is harder to clean later and can cause discoloration.
- Avoid abrasive pads. They can create micro-scratches that weaken the glass.
- Use cookware with smooth bottoms. Rough materials can cause friction damage.
- Don’t use aluminum foil directly on the surface. It can melt and stick to the glass.
- Check for residue under cookware. Grease or moisture can cause burning marks during cooking.
- Wipe the surface only when cool. Cleaning a hot surface can smear the cleaner and leave stains.
With consistent care, your glass cooktop will stay sleek, shiny, and safe.
Summing Up
Taking care of it right away means your cooktop will be safe, sturdy, and just as sleek as before. After it’s fixed, small habits like cleaning after each use, handling cookware gently, and avoiding sudden temperature changes will keep it in great condition.
A bit of attention now saves you from bigger issues later. Treat your cooktop with care, and it will keep your kitchen working smoothly for years to come.