
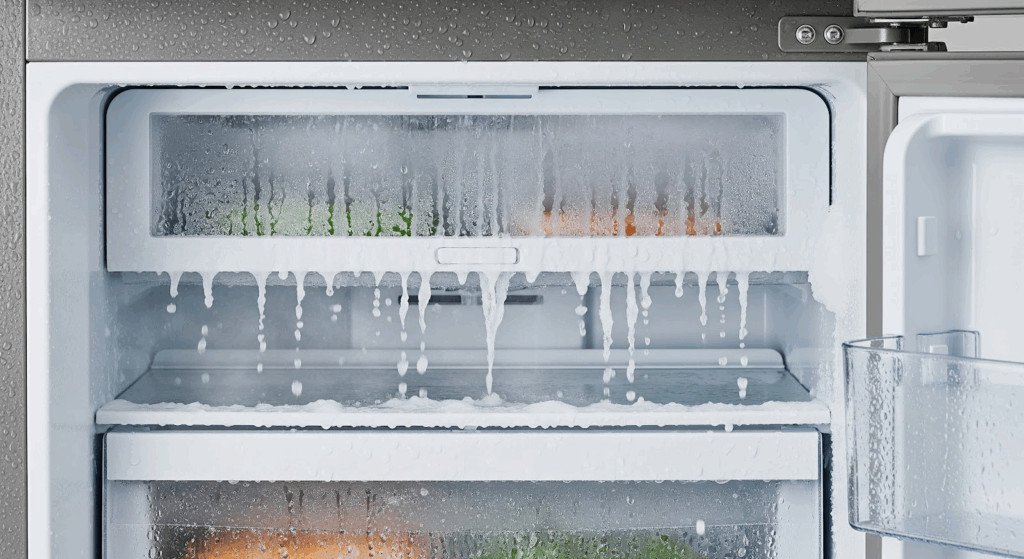
If your freezer seems warmer than usual or if your refrigerator stays in a defrost cycle for too long or not at all, the defrost thermostat might be the issue. This small part is located behind the freezer’s back panel. It monitors the temperature of the evaporator coils and stops the defrost heater once the coils are warm enough. When it fails, the system may over-defrost or not defrost at all, which causes temperature problems in both the freezer and fresh food sections.
The good news is that many homeowners can replace the defrost thermostat themselves. It is faster and more affordable than calling a professional. With a few basic tools and a bit of time, you can fix the problem and get your refrigerator working properly again.
Follow this guide to learn how to identify a faulty defrost thermostat and replace it yourself.
Signs That the Defrost Thermostat Has Failed
Before you replace anything, it’s helpful to understand the warning signs. The most reliable way to confirm the thermostat is faulty is by using a multimeter. You can also look for a few common symptoms:
- The refrigerator seems to run continuously or not at all
- The freezer is not staying cold enough
- The refrigerator compartment is warmer than usual
- Ice buildup appears on the evaporator coils
- Food in the fridge is spoiling sooner than expected
Common Causes of Thermostat Failure
Defrost thermostats are exposed to constant temperature changes and moisture, both of which can affect their lifespan. Here are some reasons they may stop working:
- Frequent defrost cycles that overheat the part
- Corrosion due to high moisture levels
- Poor electrical connections or wire damage
- Age-related wear that causes the thermostat to become unresponsive
- Overloading the freezer, which affects airflow and cooling efficiency
How to Test the Defrost Thermostat
You can test the thermostat with a multimeter to confirm whether it needs to be replaced. Here’s how to do it safely:
- Unplug the refrigerator before starting any work. Safety is always the first step
- Access the thermostat by removing the back panel inside the freezer. You may need to remove the light cover first, depending on your refrigerator model
- Disconnect the thermostat wires. Some models have a quick-connect plug, while others require you to cut the wires
- Touch the multimeter probes to each terminal or wire of the thermostat while the unit is cold
- Check for continuity. If there is no continuity, the thermostat has failed and needs to be replaced
If the thermostat still has continuity, it is likely not the source of the issue. In that case, reconnect the wires using wire nuts or butt connectors before reassembling the unit.
Tools You May Need
Gather your tools before you begin. Depending on your refrigerator’s make and model, you may not need all of these, but it is helpful to have them ready:
- Phillips screwdriver
- Flathead screwdriver
- Wire cutter or crimper
- Wire nuts or butt connectors
- Work gloves
How to Replace the Defrost Thermostat in a Refrigerator
Below are the steps to help you replace the defrost thermostat safely and get your refrigerator working properly again.
Disconnect Power and Access the Freezer
- Unplug the refrigerator to cut off power.
- Open the freezer compartment and locate the back panel.
- Use a Phillips screwdriver to remove all screws holding the back panel in place.
- If your unit has a light cover under the ice maker, squeeze it gently to release the locking tabs and remove it.
Remove the Back Panel
- Lift the back panel from the bottom to free it from the locking tabs near the top.
- Tilt the panel outward and pull it downward to release it from behind the ice maker.
- Rotate the panel to remove it completely if shelving or bins are in the way.
Remove the Old Defrost Thermostat
- Locate the defrost thermostat clipped onto the evaporator coil, typically on the top or side.
- Carefully unclip the thermostat without touching or damaging the coils.
- Use wire cutters to cut the two wires connecting the thermostat.
- Strip the ends of the refrigerator’s remaining wires using a wire stripper.
Install the New Defrost Thermostat
- Strip the ends of the wires on the new thermostat.
- Twist each wire from the new thermostat to the corresponding wire from the refrigerator.
- Secure each connection using wire nuts or butt connectors by crimping them in place.
- Clip the new thermostat onto the evaporator coil in the same spot where the old one was attached.
- Push the wires neatly out of the way.
Reassemble the Freezer Compartment
- Reinstall the back panel by aligning it properly and pressing it back into position.
- Tighten all screws to secure the panel.
- Snap the light cover back into place if it was removed.
- Reattach the shelving, bins, wall clips, and rails. Put the rails on their correct sides.
- Slide the ice bin back into position.
Restore Power and Test the Unit
- Plug the refrigerator back into the wall outlet.
- Turn the water supply back on if it was turned off.
- Wait for the freezer to begin cooling again.
- Listen for the evaporator fan to make sure it’s cycling normally.
- Put frozen food back in once the freezer is cooling properly.
- Monitor the temperature to confirm stable operation.
What to Remember
Replacing a defrost thermostat may seem like a small job, but it can make a big difference in how your refrigerator works. If the freezer isn’t staying cold or the fridge feels too warm, this part is often the cause.
Taking the time to test and replace it can help you avoid spoiled food and more expensive repairs later on. With just a few tools and careful steps, you can handle the fix without needing to call for service. Always keep an eye on the signs and take action early to keep your appliance running the way it should.