
Convection ovens have become increasingly popular in recent years due to their ability to cook food faster and more evenly than conventional ovens. This is achieved through the use of a built-in fan that circulates hot air throughout the oven cavity. However, like any appliance, convection oven fans can wear out over time or fail unexpectedly. Replacing a broken convection oven fan may seem daunting, but with the right tools and replacement parts, it can easily be done as a DIY project.
In this DIY guide, you’ll learn everything you need to know about convection oven fan repair and replacement in order to breathe new life into your oven. We’ll cover troubleshooting common fan issues, list the tools/parts required, provide safety tips, and outline the step-by-step process for removal and installation. You can save significant money on repair costs by following these instructions yourself. Let’s get started!
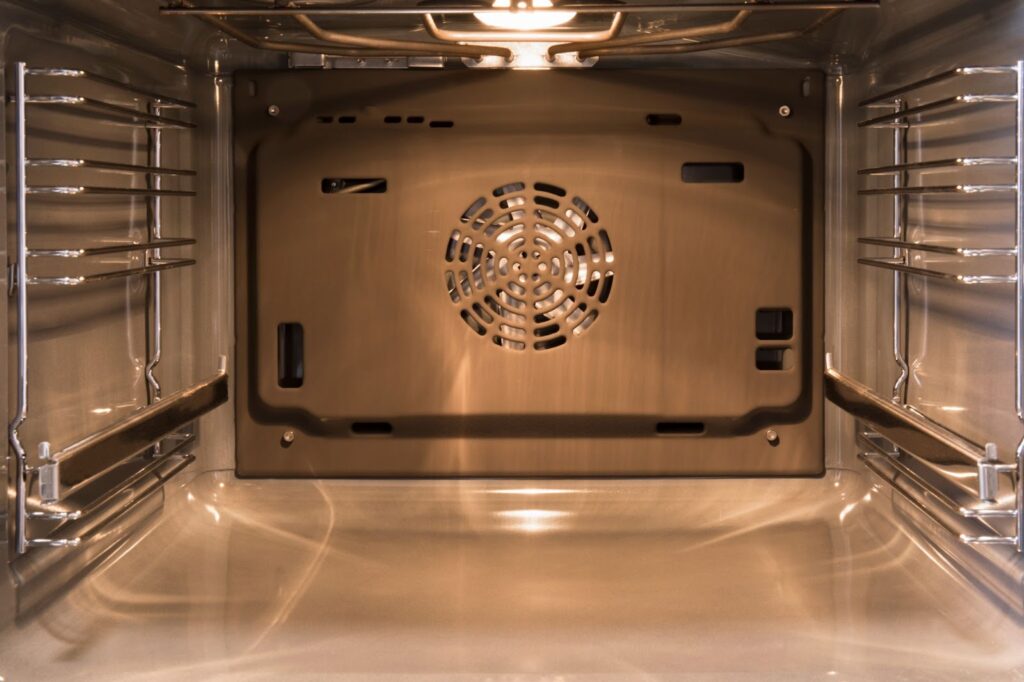
Understanding Convection Oven Fans
To understand why the fan is such a critical component in a convection oven, it helps to first understand what sets these ovens apart from conventional ones. While traditional ovens rely solely on radiant heat from baking and broiling elements to cook food, convection ovens include an additional heat source – rapidly moving hot air.
This accelerated hot air is produced by the convection fan and heating element working together. The fan circulates air in the oven cavity while the heating element warms it up to very high temperatures – usually between 350°F to 425°F. The constant rushing movement of hot air transfers heat energy to food much quicker than stationary hot air. This allows convection ovens to cook up to 25-30% faster than conventional ovens.
The increased velocity of hot air also promotes extremely even heating and browning. Food cooked in a convection oven is crispy and golden on all sides since there are no low-heat spots for moisture to accumulate. This makes convection ovens the choice for tasks like baking pastries or roasting meats.
Clearly, the convection fan plays a huge role in facilitating these desirable cooking benefits. Without a properly working fan, a convection oven functions no better than a standard one.
How Convection Oven Fans Work
Convection oven fans are essential for generating that accelerated flow of hot air responsible for faster, crispier, and more even cooking. Let’s examine their design and operation more closely:
- Placement – Convection fans are positioned at the back interior wall of the oven cavity. This allows air to be drawn in through vents across the entirety of the chamber.
- Circulation Path – Air travels in a looping pattern from the front to back of the oven. This movement ensures heat energy is evenly dispersed.
- Fan Direction – Most convection fans rotate clockwise when facing the oven’s back wall. This encourages optimal airflow.
- Operation Mode – Convection fans turn on automatically whenever the oven lighting element engages. This links fan operation directly to heating function.
- Speed Settings – Some convection ovens have a fan speed selector. Higher speeds circulate air more rapidly for extra-quick cooking.
While the fan is conceptually simple, it is absolutely vital for allowing a convection oven to leverage hot air movement for superior cooking.
Troubleshooting Convection Oven Fan Issues
Considering how important proper airflow is in a convection oven, a broken fan can completely hinder functionality. Unfortunately, fan failures are not uncommon as motors wear out or connections come loose over years of high-temp operation.
Here are some of the most frequent convection oven fan issues and how to diagnose them:
1. Fan Not Turning On
The most obvious symptom of fan failure is a fan that no longer starts up when the oven turns on. However, it’s important to first confirm that the issue lies with the fan rather than general electronic control failure:
- Verify that the oven heating element engages as expected when starting a cook cycle. If the element fails to ignite as well, it likely indicates an electrical issue impacting appliance operation.
- Check that the fan has not merely become unplugged. Tracing its wiring back to the main circuit board can determine if a loose connection is solely responsible.
2. Noisy Operation
Sometimes convection fans continue running but produce unpleasant noises like squealing, grinding, or rattling. This usually happens when bearings inside the motor wear out from high-speed rotational forces and ongoing high heat inside the oven:
- Shrieking or squealing noises signal the fan shaft rotating inside a damaged bearing.
- Low groaning or grinding noises indicate brushes rubbing directly on the armature without smooth bearings.
- Rattling together with scraping against housing demonstrates the fan becoming physically misaligned as mounting components deteriorate.
3. Uneven Heating
Since these fans circulate hot air responsible for oven heating, another symptom of convection fan breakdown is poorly heated oven zones:
- If airflow is blocked by a stuck fan blade, one oven quadrant may overheat while the opposite side remains cool.
- A fan not spinning fast enough allows heat stratification rather than active circulation. Sections of food (often towards oven back) end up undercooked.
- A completely dead motor forces the oven to rely on whatever residual hot air movement occurs through natural convection currents – resulting in extremely uneven heating.
Diagnosing the exact fan issue is important for determining whether repair or replacement is required. Catching and addressing fan problems promptly also prevents secondary damage from issues like overheating in Dead Zones.
Tools and Parts Needed
Replacing a convection fan is greatly simplified by having the proper tools and components on hand in advance:
Tools
- Safety goggles
- Work gloves
- Phillips and flathead screwdrivers
- Socket wrench set
- Needle nose pliers
- Multimeter (for testing)
- Vacuum (for cleanup)
Parts
- Replacement convection fan motor
- Fan blade (if replaced separately)
- Mounting screws, nuts, washers
- Steel mesh guard
- High-temp silicone adhesive
Additional parts like thermal fuses, switches, or control boards may be needed if troubleshooting reveals associated components also requiring replacement.
Having all necessary equipment prepared ahead of time minimizes project duration and ensures convection capability can be restored without unnecessary appliance downtime.
Also Read: Oven Cleaning Hacks That Really Work
Step-by-Step Replacement Guide
With proper tools in hand, we’re ready to tackle the fan installation itself:
1. Prepare the Oven
Safety first! This involves both personal precautions and appliance preparations:
- Don appropriate gloves and goggles to protect from sharp edges and high heat.
- Turn off power supply at breaker/fuse box to avoid electrical hazards.
- Allow the oven interior to fully cool if recently used.
- Remove oven racks and any debris that could impede access.
- Review the oven manufacturing manual for model-specific instructions.
2. Remove Old Fan
With safety preparations complete, we’re ready to extract the original fan:
- Remove outer fan guard utilizing a screwdriver – this protects and visually hides the fan.
- Detach fan blade to expose mounting screws around central hub. Needle nose pliers can grip into blade holes for stubborn cases requiring extra torque.
- Disconnect fan wiring harness noting wire colors and terminal positions to aid reinstallation.
- Unscrew bracket bolts to detach fan motor from back oven wall. There may be as many as 4 mount points.
Extract fan motor & blade, taking care not to snag and tear wires stretched through the oven rear.
3. Install New Fan
Installation of the new convection fan follows essentially the reverse order of removal:
- Guide replacement fan wiring through back of oven first, taking care not to pinch the cable.
- Align mount holes and attach fan bracket to back wall with original hardware. Alternate tightening opposing corner screws evenly.
- Reconnect wiring harness matching wire colors and terminal positions. Ensure connections are fully inserted and secure.
- Attach new fan blade onto motor shaft at proper positioning to direct optimal airflow.
- Reinstall mesh fan guard using existing screws and spacers. Bend tabs if necessary to sit flush with oven walls.
Double-check that all screws, bolts, and electrical connections are properly tightened to withstand years of high-velocity rotation and extremely high heat operation.
4. Validate Functionality
Before closing up the oven, we must validate that full functionality has been restored:
- Reconnect power supply and turn oven back on to test electronics and fan activation.
- Power on convection mode and each oven function to trigger fan operation per that program setting.
- Listen and look through oven window to check for smooth whisper, quiet spinning, and no wobble or scraping.
- Feel inside oven cavity while holding door slightly ajar to perceive airflow direction and force – taking care not to contact heating elements directly.
Assuming tuned performance is achieved, button the oven back up by reinstalling all interior racks, guards, and knobs removed during the process.
With fan replacement complete, the convection oven should now be able to efficiently circulate air for quick and even cooking once again. Break out your old convection-optimized recipes and enjoy those faster cook times!
Tips for Cost-Effective Fan Replacement
While a fully new fan motor assembly from an appliance dealer could cost over $300, there are more affordable alternatives to revive your convection function on a budget:
Choose Universal Fit Motors
Rather than overpriced proprietary factory parts, universal condenser fan motors can readily match required specs at under $100. Just ensure your selected unit meets original voltage, horsepower, RPMs, mounting, and dimensional requirements.
Consider a Fan Blade Kit
If the original motor windings test functional, replacing just the fan blades themselves for as little as $40 may be the most cost-effective option. Kits generally include matched blades and hubs.
Repair Certain Issues
Minor problems like stuck/bent blades, loose wiring, or worn fan bearings can sometimes be repaired for the cost of parts alone. DIY-savvy individuals may attempt to fix these issues directly rather than replace the entire fan assembly.
Buy Refurbished
Seek out professionally refurbished convection fans, which provide significant cost savings over new OEM parts with the assurance of quality rebuilds.
Find Used Assemblies
Finally, sourcing good-condition secondhand convection fans from scrapped matching appliance models is an economical solution. These replacements taken from donor ovens often cost under $50.
With smart shopping and a little mechanical aptitude, convection oven repair can certainly fall within DIY budgets.
Also Read: Oven cooking unevenly: Common causes & how to fix
Conclusion
A properly functioning convection fan is the heart of accelerated, even cooking performance in these modernized ovens. Luckily, relatively straightforward design consisting principally of fan blade, motor, and mounting hardware makes DIY replacement quite achievable even for homeowners without professional appliance repair experience.
Following the steps within this guide to accurately diagnose fan issues, assemble necessary tools, remove the original fan assembly, install the replacement component, and validate renewed functionality should restore rapid hot airflow to start cooking with convection benefits once again.
While genuine OEM factory parts often run $300 or more, exploring universal motors, repair options, and buying refurbished/used fans helps keep costs reasonable. Within a single afternoon and $100 or less, anyone can breathe new life into a broken convection appliance.
Hopefully, this DIY convection oven fan replacement guide gives you renewed confidence to tackle the repair yourself. So turn off that malfunctioning unit, whip out some tools, and let’s get cooking!